
Take The Temperature of Your Golf Course with Normalized Difference Vegetation Index (NDVI)
Thermal imaging provides an in-season checkup. Checkups with your doctor are designed to avert a major health issue. Thermal imaging does the same for your golf course.
To determine a field’s stress level, look at an aerial photo that shows the variance in ground temperature. A cooler area is less stressed; the warmer the ground area, the more it is stressed.
We’ve been able to use color photos, NDVI maps and now thermal images as scouting aids and as tools to help define and refine management zones.

Thermal imaging is just emerging as a tool for golf courses because the high-tech camera equipment that’s required is now available.
Thermal cameras measure the energy emitted by the vegetation to produce infrared images, which are then processed to apply the scaling to show the variation in the area. The cameras can work just as well in the darkness of night. NDVI maps show a measure of ground area health with near-infrared images that rely primarily on reflected light from the sun and amplify changes in color.
The camera has the ability to decipher differences of up to three-hundredths of a degree Celsius. The thermal image is then scaled down to a narrow temperature spectrum and a color palate is applied to assess the variation.
With these images, you can see the problem areas of the golf course, and then go out and address these specific areas.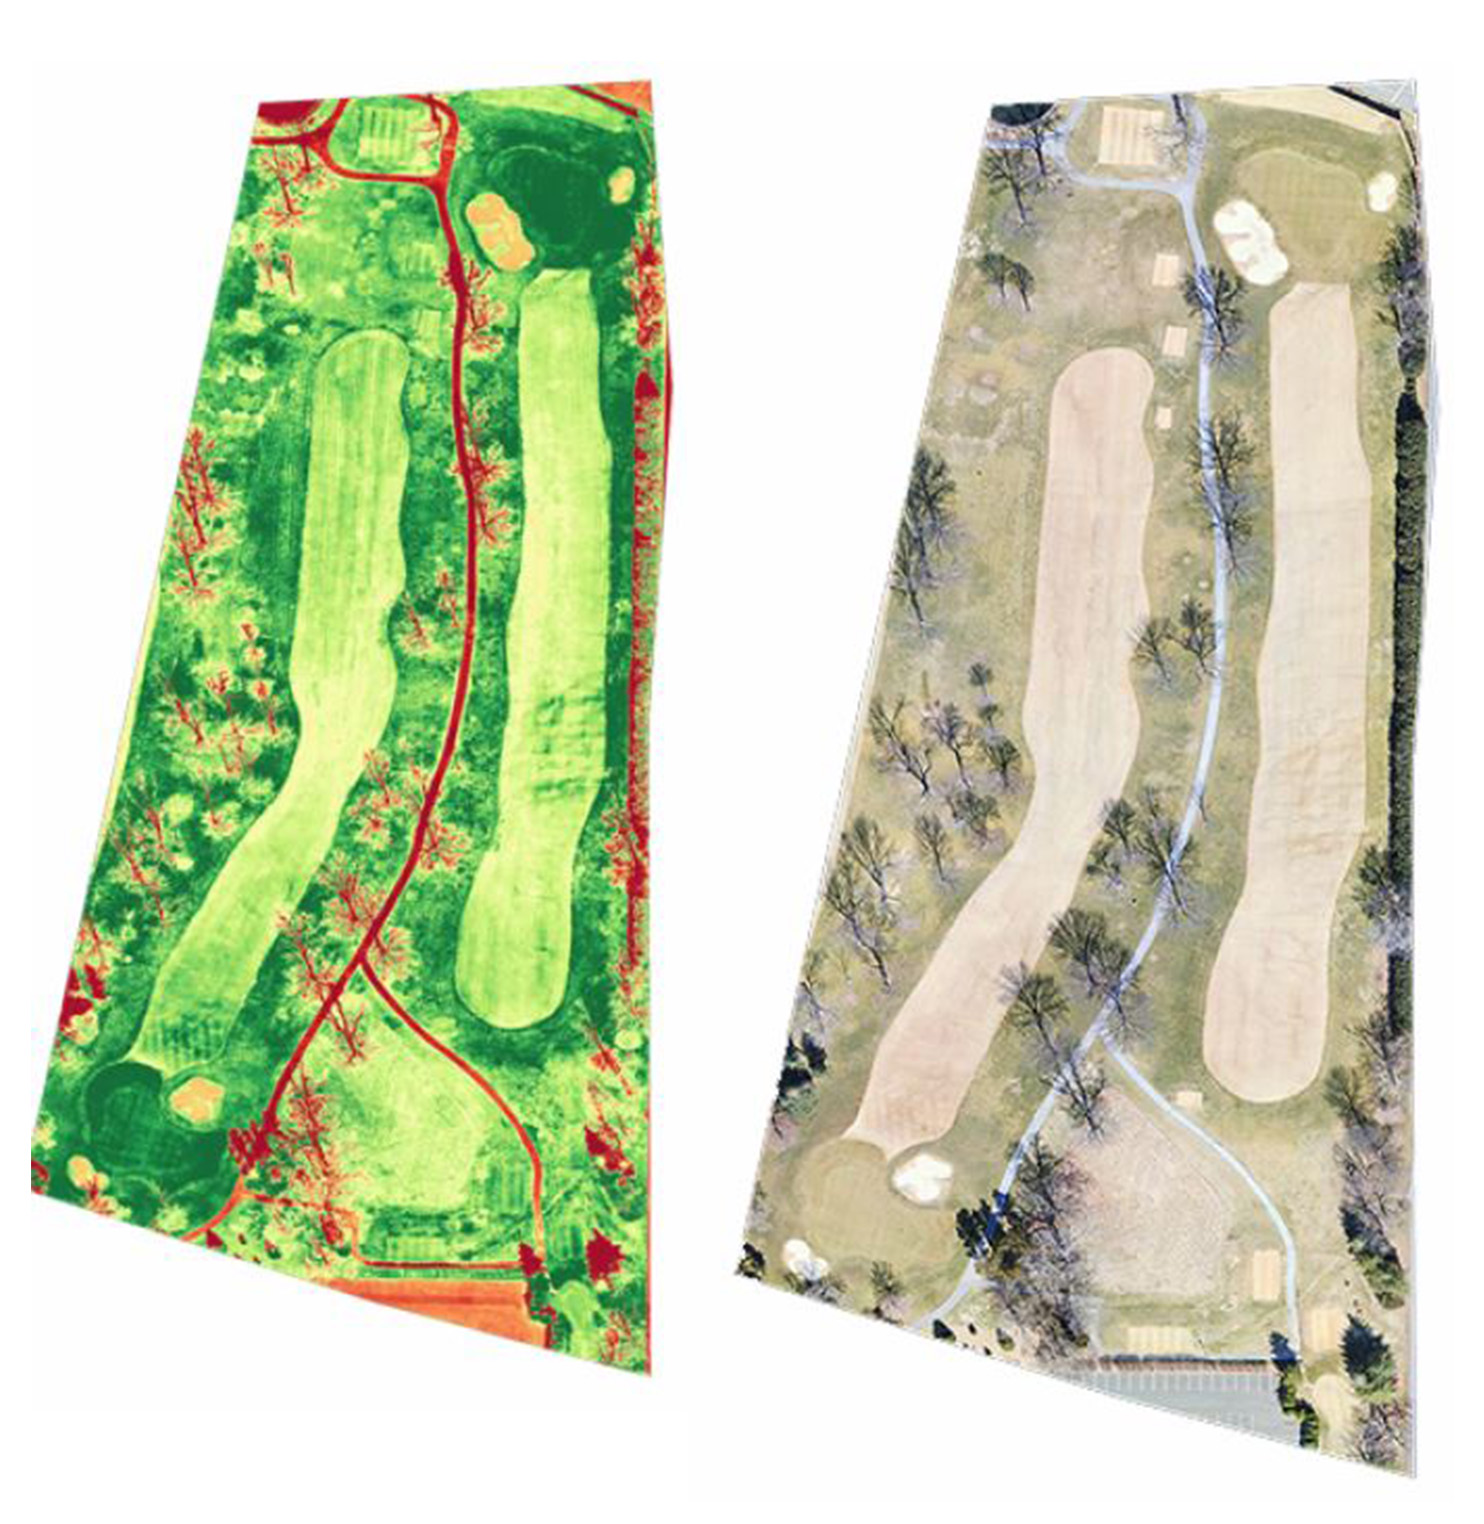
The green shows the healthy areas of the course. The yellow areas document the unhealthy areas that need attention. The red areas show vegetation dormancy, roads, dirt and buildings.
What is NDVI Drone Mapping and How Does It Work?
NDVI drone mapping is an innovative technology that is revolutionizing the way we map land, assess crop health, and monitor environmental conditions. By using special cameras and a drone, the NDVI drone mapping process allows users to quickly and accurately measure the amount of healthy vegetation in a given area. This technology is providing a quick and cost-effective way to monitor vegetation health, assess land use and occupation, and even predict future crop yields. Understanding how NDVI drone mapping works can help you make the most of this revolutionary technology.
How Does NDVI Drone Mapping Work?
NDVI drone mapping works by using a special camera that is mounted on a drone. This camera is able to take images of the land from a bird’s eye view. The camera is able to detect the levels of green vegetation in an area, which is then used to generate a map that shows the amount of vegetation in a given area.
The camera is able to detect the levels of green vegetation in an area by measuring the intensity of reflected light. When a beam of light is shined onto a green surface, the green surface reflects more light than other surfaces. This is what allows the camera to detect the amount of green vegetation in an area.
The camera is then able to take multiple images of a given area and stitch them together to create a detailed map of the land. This map can then be used to assess the amount of vegetation in an area, as well as other important factors such as land use and occupation.

Benefits of NDVI Drone Mapping
NDVI drone mapping is a powerful tool that offers numerous benefits for both businesses and individuals. Some of the most notable benefits of NDVI drone mapping include:
- Quick and Accurate: NDVI drone mapping is much faster and more accurate than traditional methods of land mapping. This makes it ideal for large-scale projects that require detailed and accurate data.
- Cost Effective: NDVI drone mapping is significantly more cost effective than traditional methods of land mapping and surveying. This makes it ideal for businesses and individuals who need to map large areas of land without breaking the bank.
- Detailed Maps: NDVI drone mapping is able to generate detailed maps of an area that can be used to assess land use, occupation, and vegetation health.
- Environmental Monitoring: NDVI drone mapping can also be used to monitor changes in the environment over time. This can be used to better understand the impact of human activity on the environment.
- Predicting Crop Yields: NDVI drone mapping can also be used to predict future crop yields by assessing the health of vegetation in a given area.
NDVI Drone Mapping Applications
NDVI drone mapping has a wide range of applications in both the commercial and private sectors. Some of the most common applications of NDVI drone mapping include:
- Land Surveying: NDVI drone mapping is often used for land surveying and mapping. This is because it offers a quick and cost-effective way to generate detailed maps of an area.
- Agricultural Monitoring: NDVI drone mapping can also be used to assess crop health and predict future crop yields. This can help farmers and agricultural businesses to optimize their operations and increase their yields.
- Environmental Monitoring: NDVI drone mapping can be used to monitor changes in the environment over time. This can help organizations to better understand the impact of their activities on the environment.
- Construction Projects: NDVI drone mapping can also be used to monitor the progress of construction projects. This can help businesses to assess the progress of their projects and ensure that they are meeting their deadlines.
- Disaster Management: NDVI drone mapping can also be used to assess the impact of natural disasters on an area. This can help organizations to better understand the extent of the damage and plan for future disasters.
Types of NDVI Cameras
NDVI drone mapping requires the use of specialized cameras that are able to detect the levels of green vegetation in an area. There are two main types of NDVI cameras: traditional cameras and infrared cameras.
Traditional cameras are able to detect the levels of green vegetation in an area by measuring the intensity of reflected light. This makes them ideal for mapping large areas of land.
Infrared cameras are able to detect the levels of green vegetation in an area by measuring the intensity of infrared light. This makes them ideal for mapping smaller areas of land.
How to Set up an NDVI Drone Mapping System
Setting up an NDVI drone mapping system is a relatively simple process that requires a few basic components. The components required to set up a NDVI drone mapping system include:
- Drone: The first component needed to set up a NDVI drone mapping system is a drone. The drone should be capable of carrying the NDVI camera and flying over the area that needs to be mapped.
- NDVI Camera: The second component needed to set up a NDVI drone mapping system is an NDVI camera. This camera should be capable of taking images of the land from a bird’s eye view.
- Software: The third component needed to set up a NDVI drone mapping system is software. This software should be able to process the images taken by the NDVI camera and generate a detailed map of the land.

Interpreting NDVI Drone Mapping Results
Once the NDVI drone mapping system has been set up and the images have been taken, the data needs to be interpreted. Interpreting the data is relatively simple and can be done by comparing the map to a reference image.
A reference image can be used to compare the NDVI drone mapping results to. This reference image should be taken of the same area, but at a different time. By comparing the two images, it is possible to assess the amount of vegetation in an area and identify any changes that have occurred over time.
Best Practices for NDVI Drone Mapping
To ensure that the NDVI drone mapping process is successful, there are a few best practices that should be followed. These best practices include:
- Use a Calibrated Camera: To ensure accuracy, it is important to use a calibrated camera for NDVI drone mapping. This will ensure that the images taken by the camera are accurate and can be used to generate accurate maps.
- Use the Right Software: It is also important to use the right software for NDVI drone mapping. The software should be able to process the images taken by the camera and generate a detailed map of the land.
- Plan the Flight Path: Before beginning the NDVI drone mapping process, it is important to plan the flight path of the drone. This will ensure that the drone is able to take images of the entire area that needs to be mapped.
- Monitor the Weather: It is also important to monitor the weather before beginning the NDVI drone mapping process. This will ensure that the drone is able to take images in optimal conditions.
- Follow Privacy Guidelines: It is also important to follow privacy guidelines when using a NDVI drone mapping system. This will ensure that the images taken by the drone are not used for any illegal purposes.
Cost of NDVI Drone Mapping
The cost of NDVI drone mapping will depend on the size of the area that needs to be mapped, the type of camera being used, and the type of software being used. Generally speaking, the cost of NDVI drone mapping can range from a few hundred dollars to several thousand dollars.

Conclusion
In conclusion, NDVI drone mapping is an innovative technology that is revolutionizing the way we map land, assess crop health, and monitor environmental conditions. By using special cameras and a drone, the NDVI drone mapping process allows users to quickly and accurately measure the amount of healthy vegetation in a given area. This technology is providing a quick and cost-effective way to monitor vegetation health, assess land use and occupation, and even predict future crop yields. Understanding how NDVI drone mapping works and following the best practices for NDVI drone mapping can help you make the most of this revolutionary technology.
Call, write or text me today to review your project requirements.
stlouisdrones@gmail.com
Robert Haller, Drone Specialist
314-604-6544
